Microsoft releases Office 365 wave 15

Microsoft today released “Next-Generation Office 365 for Business”, wave 15. At an online virtual launch event, Kurt DelBene (President Microsoft Office Division) and John Case (Corporate VP) presented the new wave of Office 365 building on Exchange 2013, Lync 2013 and SharePoint 2013.

Link to press release: http://www.microsoft.com/en-us/news/Press/2013/Feb13/02-27OfficeCommercialGAPR.aspx?WT.mc_ID=soc_tw_office365

Set subscription with Powershell

When users have been synchronized to Office 365, they lack subscription, which means they cannot access Exchange, Lync or SharePoint. Microsoft has documentation on how to activate synced users with the GUI. http://technet.microsoft.com/en-us/library/hh967617.aspx This can be automated using Powershell.

 # Connect to service $Username = "admin@mydomain.onmicrosoft.com" $Password = ConvertTo-SecureString P@ssword" -AsPlainText -Force $Credentials = New-Object System.Management.Automation.PSCredential $Username,$Password Connect-MsolService -Credential $Credentials # Set location Get-MSOLUser -UnlicensedUsersOnly | Set-MSOLUser -UsageLocation "SE" # Set subscription Get-MSOLUser -UnlicensedUsersOnly | where{$_.Title -eq "Student"} | Set-MsolUserLicense -AddLicenses "contoso:STUDENTPACK" Get-MSOLUser -UnlicensedUsersOnly | where{$_.Title -eq "Teacher"} | Set-MsolUserLicense -AddLicenses "contoso:FACULTYPACK" 

Script to set new password in Office 365

The following script can be used to set new password in Office 365. Replace username and password of service account and save file as Set-Password.ps1.

Set-Password.ps1 -UserPrincipalName [UserPrincipalName] -NewPassword [NewPassord]

param
(
   [parameter(Mandatory = $true)][string]$UserPrincipalName,
   [parameter(Mandatory = $true)][string]$NewPassword
)

function Set-Password()
{
   # Connect to service
   $Username = "admin@mydomain.onmicrosoft.com"
   $Password = ConvertTo-SecureString "P@ssword" -AsPlainText -Force
   $Credentials = New-Object System.Management.Automation.PSCredential $Username,$Password
   Connect-MsolService -Credential $Credentials

   # Reset password
   $pwd = ConvertTo-SecureString $NewPassword -AsPlainText -Force
   Set-MsolUserPassword -UserPrincipalName $UserPrincipalName -NewPassword $pwd -ForceChangePassword $false
}

Set-Password -UserPrincipalName $UserPrincipalName -NewPassword $NewPassword

Updates to Live@edu upgrade process

The Microsoft Live@edu upgrade team has been working very hard to make sure the transition from Live@edu to Office 365 will be as smooth as possible. Two new features have recently been announced:

No downtime throughout the upgrade

Earlier the upgrade required a few hours downtime, but this has been altered by the service team.

The duration of the upgrade is dependent on the size of your institution, and can take days to complete, but users won’t experience any downtime throughout the upgrade.

http://community.office365.com/en-us/wikis/upgrade/overview.aspx

Password copy

The password is now copied from Live@edu to the new Office 365 account, which reduces complexity when informing the users about the service changes.

The first scheduled batches of upgrades have just started and will continue the next couple of months. The customers will receive their first email approximately 30 days
before their scheduled date.

External users in Office 365

SharePoint Online in Office 365 provides access external users. From any site in SharePoint you can invite an external user by adding th email address either to the visitors or the members group. It is recommended that you use unique permissions when you create a subsite you want to share with external users. If you haven’t done this, break role inheritance and go to the url /_layouts/permsetup.aspx to create unique groups for the site.

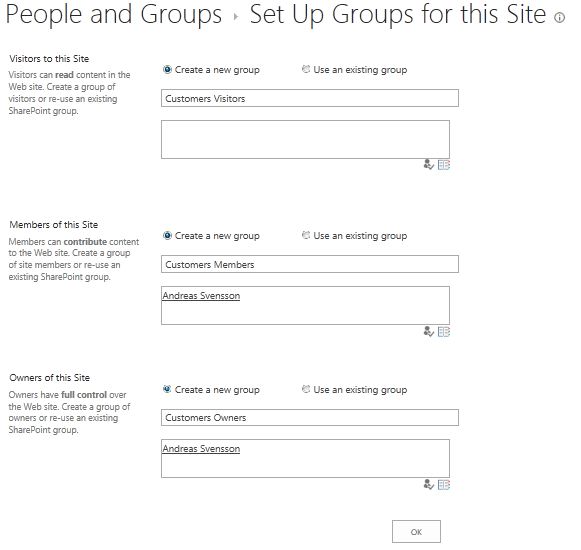
First, create a new subsite with unique permissions. Let’s call it Customers.

Make sure three new groups are created for the site.
Go to Share site and add the email address of the user.
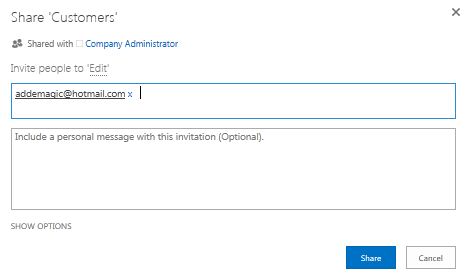
After clicking Share you will be notified the site has been shared with an external user. The person you have invited to the site receives an email that includes a link to accept the invitation. To accept the invitation, the invitee needs to provide an email address that is associated with a Microsoft account, or, if they’re an existing Office 365 customer, a Microsoft Online Services ID. If they don’t have an email address or a Microsoft account, they can create one for free.

The email address that is associated with the Microsoft account, the Hotmail, Live, or MSN address, or the Microsoft Online Services ID is the email address the person uses to log in to your SharePoint site. After login, the user will be added to the group.
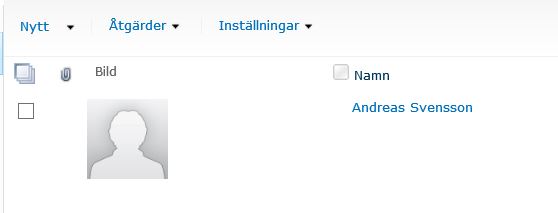
The user claim for this Hotmail account is shown below.

To add the user to other groups on other sites, use the people and add the email address.

The people picker will probably neither be able to find the account nor will you be able to search for it, so you need to know the exact email address to add the user to other sites.

Upgrade from Live@edu to Office 365

Upgrading from Live@edu to Office 365 can either be a very simple process or fairly complicated. The actual process of upgrading the domain is a three-click-procedure where most of the job is done behind the scenes.

To upgrade the domain, follow these three steps: http://www.microsoft.com/liveatedu/upgrade-center/upgrade-center-home.aspx?locale=en-US&country=US

However, you probably have automatic provisoning of accounts and maybe a Single-Sign-On (SSO) solution using certificate för Live@edu. The Microsoft recommended way of replacing OLMA for creating accounts is DirSync, but there will be an Office 365 agent for FIM and that’s what you really should use. Replacement for SSO is federation and there are two ways to implement federation:

  • Active Directory Federation Services (AD FS) 2.0
  • Shibboleth Identity Provider (IDP) with SAML 2.0 for Active Directory

You need to plan the implementation of these two features before upgrading the domain. This is best done with a test domain. You can set up both FIM agent and ADFS federation for the test domain, verify functionality and then simply switch to production when upgrading the domain. You can follow this checklist or read more about the transition on the Office 365 community.

Live@edu upgrade checklist

This checklist is for the Live@edu to Office 365 for education transition, with FIM agent and Single sign-on using federation.

  • Create a testdomain.
  • Add a public domain, such as test.yourdomain.com.
  • Configure the FIM agent for the test domain and create a few accounts. Make sure the UPN is the same in your AD as in Office 365 (e.g. test.yourdomain.com).
  • Set up SSO with ADFS or Shibboleth.
  • Verify the functionality.
  • Upgrade the Live@edu domain.
  • Make sure the UPN is correct for the upgraded users or fix it with Powershell.
  • Switch the FIM agent to the former Live@edu domain.
  • Configure the federation for the former Live@edu domain.
  • Kill the test domain.

Most of this information is collected at the community, and it is recommended to read the section about Single sign-on.

Creating an Office 365 for Education domain

If you represent a school or educational institution, make sure you sign up for Office 365 for Education. It will simplify the process of getting the education benefits (pricing). This is how you do it:

Create domain

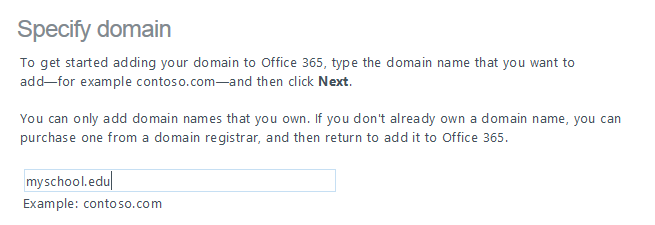
Go to Office 365 for Education, click on Compare Plans, and click on Sign up for 30-day trial. You will be asked to select a domain name and the format will be <DomainName>.onmicrosoft.com.

Verify domain

Go to Management – Domains and add a new domain. It does not need to be a .EDU-domain.

 Update DNS

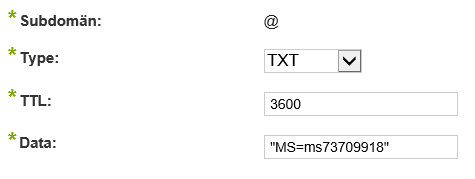
You need to verify the ownership of the domain. Do this by setting the TXT of @ in the DNS, or by pointing the MX to it. If you set the MX all mail will be directed to Office 365.

The TXT record may need to be added as a string “MS=ms73700918”.

Usually Microsoft will recognize the DNS updates within minutes, but it may take a few hours. When this is done there will be a few more hours before your domain is verified as an EDU domain. When this is done your are all set to go and “purchase” EDU licenses.

Lync federation with Office 365

It is possible to use federation between Lync in Office 365 and Lync on premises. There have been serveral issues discussed on the Office 365 community and Microsoft has a support article to provide help. I will try to describe the DNS record step more in detail, since this seems to be the problem. Basically you need to to the following:

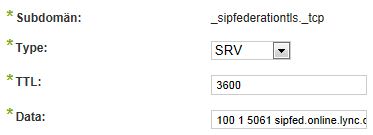
Add SRV DNS record for Lync federation. According to Microsoft you should add the following:

The problem here is to understand how to add the record. It needs to be added as _sipfederationtls._tcp.<DomainName> and the value as 100 1 5061 sipfed.online.lync.com. Look at this example:

The record can be tested with this great tool: http://www.testmyoffice365.com/

Also, you need to allow federation for your Office 365 domain. Go to the Office 365 admin portal and click on Lync. Open the domain for exteral communication, either by allowing all communication or adding domains to the exception list.

Highlights of SPC12

Here are my three quickies from SPC12.

Office 365 vs On-premise

Even though Microsoft claim a huge investment in SharePoint Server 2013, the main focus is in SharePoint Online and Office 365. There are still a few limitations what you can do in the cloud, things that can only be done on premise, but future releases will probably be the other way around. Go for the cloud if possible.

WCF is out, REST is in

The API for accessing /_api/client.svc (former /_vti_bin/client.svc) has been extended and most information can be pulled out using REST, which is fast and simple. When communication with SharePoint, use either REST or CSOM (Client-Server Object Model). There are few reasons for using WCF or any other method.

Consider hosting apps

The first two tips are simple guidelines. This is a call for concideration. When hosting an app there are three possible ways:

  • SharePoint hosted app
  • Autohosted app
  • Providerhosted app

Not only will these three methods convey various limitations on what you can do, they will also bring differnt concerns regarding authorization. This will be discussed more later.