Upgrade from Live@edu to Office 365

Upgrading from Live@edu to Office 365 can either be a very simple process or fairly complicated. The actual process of upgrading the domain is a three-click-procedure where most of the job is done behind the scenes.

To upgrade the domain, follow these three steps: http://www.microsoft.com/liveatedu/upgrade-center/upgrade-center-home.aspx?locale=en-US&country=US

However, you probably have automatic provisoning of accounts and maybe a Single-Sign-On (SSO) solution using certificate för Live@edu. The Microsoft recommended way of replacing OLMA for creating accounts is DirSync, but there will be an Office 365 agent for FIM and that’s what you really should use. Replacement for SSO is federation and there are two ways to implement federation:

  • Active Directory Federation Services (AD FS) 2.0
  • Shibboleth Identity Provider (IDP) with SAML 2.0 for Active Directory

You need to plan the implementation of these two features before upgrading the domain. This is best done with a test domain. You can set up both FIM agent and ADFS federation for the test domain, verify functionality and then simply switch to production when upgrading the domain. You can follow this checklist or read more about the transition on the Office 365 community.

Live@edu upgrade checklist

This checklist is for the Live@edu to Office 365 for education transition, with FIM agent and Single sign-on using federation.

  • Create a testdomain.
  • Add a public domain, such as test.yourdomain.com.
  • Configure the FIM agent for the test domain and create a few accounts. Make sure the UPN is the same in your AD as in Office 365 (e.g. test.yourdomain.com).
  • Set up SSO with ADFS or Shibboleth.
  • Verify the functionality.
  • Upgrade the Live@edu domain.
  • Make sure the UPN is correct for the upgraded users or fix it with Powershell.
  • Switch the FIM agent to the former Live@edu domain.
  • Configure the federation for the former Live@edu domain.
  • Kill the test domain.

Most of this information is collected at the community, and it is recommended to read the section about Single sign-on.

Creating an Office 365 for Education domain

If you represent a school or educational institution, make sure you sign up for Office 365 for Education. It will simplify the process of getting the education benefits (pricing). This is how you do it:

Create domain

Go to Office 365 for Education, click on Compare Plans, and click on Sign up for 30-day trial. You will be asked to select a domain name and the format will be <DomainName>.onmicrosoft.com.

Verify domain

Go to Management – Domains and add a new domain. It does not need to be a .EDU-domain.

 Update DNS

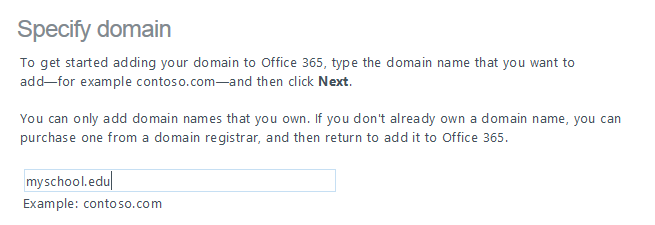
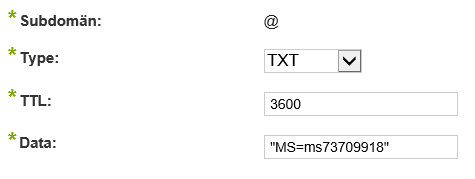
You need to verify the ownership of the domain. Do this by setting the TXT of @ in the DNS, or by pointing the MX to it. If you set the MX all mail will be directed to Office 365.

The TXT record may need to be added as a string “MS=ms73700918”.

Usually Microsoft will recognize the DNS updates within minutes, but it may take a few hours. When this is done there will be a few more hours before your domain is verified as an EDU domain. When this is done your are all set to go and “purchase” EDU licenses.

Lync federation with Office 365

It is possible to use federation between Lync in Office 365 and Lync on premises. There have been serveral issues discussed on the Office 365 community and Microsoft has a support article to provide help. I will try to describe the DNS record step more in detail, since this seems to be the problem. Basically you need to to the following:

Add SRV DNS record for Lync federation. According to Microsoft you should add the following:

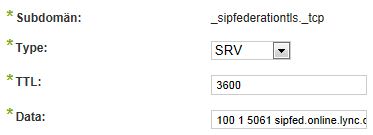
The problem here is to understand how to add the record. It needs to be added as _sipfederationtls._tcp.<DomainName> and the value as 100 1 5061 sipfed.online.lync.com. Look at this example:

The record can be tested with this great tool: http://www.testmyoffice365.com/

Also, you need to allow federation for your Office 365 domain. Go to the Office 365 admin portal and click on Lync. Open the domain for exteral communication, either by allowing all communication or adding domains to the exception list.

Highlights of SPC12

Here are my three quickies from SPC12.

Office 365 vs On-premise

Even though Microsoft claim a huge investment in SharePoint Server 2013, the main focus is in SharePoint Online and Office 365. There are still a few limitations what you can do in the cloud, things that can only be done on premise, but future releases will probably be the other way around. Go for the cloud if possible.

WCF is out, REST is in

The API for accessing /_api/client.svc (former /_vti_bin/client.svc) has been extended and most information can be pulled out using REST, which is fast and simple. When communication with SharePoint, use either REST or CSOM (Client-Server Object Model). There are few reasons for using WCF or any other method.

Consider hosting apps

The first two tips are simple guidelines. This is a call for concideration. When hosting an app there are three possible ways:

  • SharePoint hosted app
  • Autohosted app
  • Providerhosted app

Not only will these three methods convey various limitations on what you can do, they will also bring differnt concerns regarding authorization. This will be discussed more later.

Create Office 365 accounts using Powershell

When Office 365 was released, provisioning accounts with DirSync was the only available method. There was no support for Powershell which was unfortunate. Since then Microsoft has released Powershell support and readily documentation. This article describes a quick way to create an account in Office 365 using Powershell.

To begin using the Office 365 cmdlets, you first need to install them. This is described under section Install the Office 365 cmdlets. Use x64 and make sure you set ExecutionPolicy to RemoteSigned.

Set-ExecutionPolicy RemoteSigned

Then you need to import Powershell module for Office 365.

Import-Module MSOnline

Create a session.

$Username = "admin@mydomain.onmicrosoft.com"
$Password = ConvertTo-SecureString "P@ssword" -AsPlainText -Force
$Credentials = New-Object System.Management.Automation.PSCredential $Username,$Password
Connect-MsolService -Credential $Credentials

Create a new User.

New-MsolUser -UserPrincipalName johndoe@mydomain.onmicrosoft.com -DisplayName "John Doe" -FirstName "John" -LastName "Doe"

New-MsolUser will create a random password and return a MsolUser object which contains the new password. However, when logging in to the portal, user will face an error message.
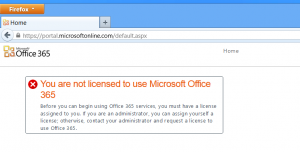
This is beacuse a user needs to be assigned to a subscription. To do this UsageLocation nedds to be set and second a license added:

Set-MsolUser -UserPrincipalName johndoe@mydomain.onmicrosoft.com -UsageLocation "US"
Set-MsolUserLicense -UserPrincipalName johndoe@mydomain.onmicrosoft.com -AddLicenses "tengil:ENTERPRISEPACK"

It is possible (and recommended) to create a user with a license in a single call.

New-MsolUser -UserPrincipalName johndoe@mydomain.onmicrosoft.com -DisplayName "John Doe" -FirstName "John" -LastName "Doe" -UsageLocation "US" -LicenseAssignment "Contoso:BPOS_Standard"

A simple script to summarize this:


param(
[parameter(Mandatory = $true)][string]$AdminUsername,
[parameter(Mandatory = $true)][string]$AdminPassword,
[parameter(Mandatory = $true)][string]$UserPrincipalName,
[parameter(Mandatory = $true)][string]$DisplayName
[parameter(Mandatory = $true)][string]$FirstName,
[parameter(Mandatory = $true)][string]$LastName,
[parameter(Mandatory = $true)][string]$UsageLocation,
[parameter(Mandatory = $true)][string]$LicenseAssignment
)

function New-O365User()
{
if((Get-Module MSOnline) -eq $null)
{
Import-Module MSOnline
}

$pwd = ConvertTo-SecureString $AdminPassword -AsPlainText -Force
$Credentials = New-Object System.Management.Automation.PSCredential $AdminUsername,$pwd
Connect-MsolService -Credential $Credentials

New-MsolUser -UserPrincipalName $UserPrincipalName -DisplayName $DisplayName -FirstName $FirstName -LastName $LastName -UsageLocation $UsageLocation -LicenseAssignment $LicenseAssignment
}

New-O365User -AdminUsername $AdminUsername -AdminPassword $AdminPassword -UserPrincipalName $UserPrincipalName -DisplayName $DisplayName -FirstName $FirstName -LastName $LastName -UsageLocation $UsageLocation -LicenseAssignment $LicenseAssignment
Create an Office 365 domain

There are several ways to create a new Office 365 domain and at the moment there are several different types of domains available. There is the standard Office 365 offer, the Office 365 Enterprise Preview (built on SharePoint 2013) and finally the hard core Office 365 Developer Site.

Office 365

To create a domain for a school, company or institution, create an ordinary Office 365 domain. There is a 30 days trial and you will have time to test the domain thoroughly. If you want to use the Office 365 for Education offer you sign up for the trial, assign your institution address to it and have Microsoft verify eligibility.

http://www.microsoft.com/en-us/office365/default.aspx

Office 365 Enterprise Preview

Office 365 Enterprise Preview is the latest and coming version of Office 365, built on SharePoint 2013. You can sign up for a free trail which has a longer expiration time than the regular Office 365 trial site. With the preview you get 25 account to play around with Office, SharePoint, Lync and Exchange.

http://www.microsoft.com/office/preview/en/office-365-enterprise

Office 365 Developer Site

Office 365 Developer Site is the type of domain you need to get. With an Office 365 Developer Site you only get one account, but that’s all you need to start creating apps for Office 365.

http://msdn.microsoft.com/en-us/library/fp179924(v=office.15).aspx